This checklist can be your roadmap to learning all things bitcoin and navigating this website. Follow the process outlined below and learn at your pace. If at any point you would like to discuss a topic or item on the list, book a session with me.
- Learn the basics of bitcoin by reviewing the “What is bitcoin” post. Take the time to watch a couple of the short videos. You will begin to realize that money does not have to be managed by governments; rather money is something you have confidence in. For bitcoin, that comes first by using it so that you build your confidence in its function as money.
- See additional resources which include a book recommendation.
- Next is planning how you will secure and protect your bitcoin private keys. Private keys today will mean 12 words. Review the private key storage (hot) and take some time to determine where you will store them. Do not be concerned with the cold storage information yet, that will be later on in the mastery checklist.
- Buy $100 worth of bitcoin, take possession of it then practice sending it. Here is how you do that:
- First review “How to buy bitcoin” post, and if available for you, setup your Strike account and deposit a MAXIMUM of $100.
- Once deposited, do not use the “Buy” bitcoin feature. simply keep in cash and when you get your bitcoin address from your first bitcoin withdrawal post, use the Send Cash feature to a “bitcoin wallet” keeping in mind that you will pay a sending fee, send $95 to cover fees.
- Now that you have received approximately $95 worth of bitcoin, you will need to wait until you have 6 confirmations before you can practice sending it. Blue wallet will not allow you to send it until you have the confirmations.
- Using another device with Blue wallet installed, create another wallet with different private keys and save them the same way.
- Now you should have 2 devices with bluewallet installed and one of them has $95 worth of bitcoin. The other with 0 bitcoin.
- Press Receive on the device with 0 bitcoin. Send $50 to it from the other device.
- Continue moving it around and spending different amounts.
- The intent of this $100 exercise is to gain confidence with managing your private keys, familiarizing yourself with generating new addresses, reviewing transaction fees and searching the mempool.space website for your transactions.
- You will eat up some of your bitcoin for transaction fees, that is ok! the more you spend, the more you will learn!
- Using another device with Blue wallet installed, create another wallet with different private keys and save them the same way.
- At this point you have a handful of bitcoin transactions under your belt, your private keys are stored and you are feeling more comfortable with the idea that you have complete control over your bitcoin. It’s time to install software on your home computer or laptop that offers more features. In addition, sending bitcoin as you did is a slow process, not meant to be used while out in public. Sending bitcoin should be reserved for large transactions or held for long term savings. Therefore, having bitcoin on your phone wallet should be limited to these test transactions and moved to a more stable environment like your home computer.
- Download sparrow wallet to your default downloads folder but before you install it, you need to make sure that it’s not malware or was compromised when you downloaded. This may seem extreme, but you are going to be using this software, just like you did on your mobile phone with Blue wallet, to store your MONEY! When you downloaded Blue wallet on your phone, it was through the app store which is a trusted delivery method. Since you are downloading sparrow wallet via the internet, you need to verify it. It’s easy.
- Download gpg4win by pressing the green download button. This software will do the verification easily.
- Install the gpg4win software using the default settings.
- Go to your windows search, lower left corner and type cmd for Windows. Search for Terminal.app for Mac.
- type directly into the command line:
- curl https://keybase.io/craigraw/pgp_keys.asc | gpg –import
- It will show it downloaded a signature.
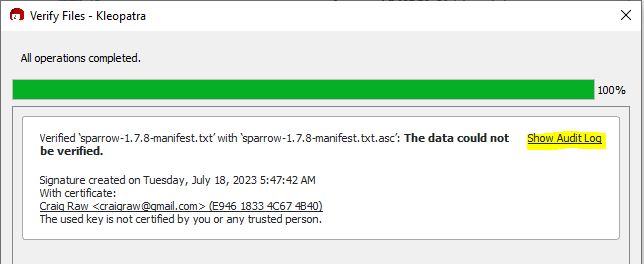
- Download the Manifest Signature file, it should read something like sparrow-x.x.x-manifest.txt.asc on the website where you downloaded gpg4win.
- double click on that file and this window will appear. Click on Show Audit Log
- Download sparrow wallet to your default downloads folder but before you install it, you need to make sure that it’s not malware or was compromised when you downloaded. This may seem extreme, but you are going to be using this software, just like you did on your mobile phone with Blue wallet, to store your MONEY! When you downloaded Blue wallet on your phone, it was through the app store which is a trusted delivery method. Since you are downloading sparrow wallet via the internet, you need to verify it. It’s easy.
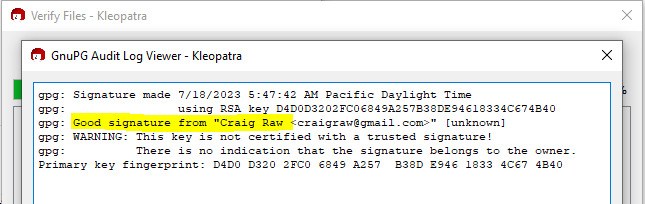
- We are looking for the highlighted portion to appear. The warning is in regards to your computer knowing if the key you downloaded is trusted, you have to indicate its trusted for the warning to go away. That is not necessary for this one-time step.
- Next, take some time to learn how to use sparrow wallet by creating a new wallet with a new private key; yes, more words you need to write down. Over time, you will end up with a couple sets of private keys for different purposes. During this step, you will consolidate all your bitcoin into this new wallet in sparrow. This will allow you to discontinue using the private keys you got from Blue wallet.
- This is an excellent 30 minute video tutorial on YouTube, follow it by sending your bitcoin from blue wallet into sparrow.
- You will be introduced to labeling your bitcoin so you know where it came from when you send it to someone else.
- When following the sending instructions, use one of your blue wallets to receive. You can send it back to your Sparrow wallet later on. More practice!
- Do not follow the instructions to set fees low, use medium or fast for these tests, you do not want to wait days for a single transaction.
- The $100 you purchased and have been moving around is meant to be used for your bitcoin learning.
- With Sparrow wallet setup, you need to learn how to restore a wallet. Restoring a wallet is the process of taking your private key, those 12 words and entering them into the Sparrow wallet software. Using the same Sparrow wallet tutorial but at this point in the video, instead of pressing generate new words, simply enter the 12 words then press Create Keystore. Use one of your Blue wallet private keys.
- The software will search for transactions and display them in the transactions tab.
It’s important to note that your private keys should never be shared with any website, email, chat, text message or any communication mechanism OTHER than software you have validated and installed on your own computer.
- At this point you should have practiced entering the private keys into sparrow and bluewallet. Before purchasing and storing bitcoin, ensure that you always test new private keys before buying more than $100. We will review the different types of devices in the testing post later on, for now we will focus on tests using sparrow and bluewallet only.
- At this point, you should be thinking about how much bitcoin you want to purchase. Things to consider based on the amount of money and its origin.
- Keep track of your exchange purchases for tax purposes. Document the date, price, and bitcoin amount purchased.
- $1,000 or less per month
- Once you accumulate $1,000 on the exchange, generate a new address from Sparrow wallet, and send it. Properly document in the wallet where the bitcoin came from.
- $1,000 and up per month
- If this is your desired monthly bitcoin purchase or large one-time purchase, you are not at the level of mastery to take custody of that much bitcoin yet.
- Now that you have accumulated a couple thousand dollars’ worth of bitcoin in different addresses, it’s a good point to learn about privacy options. When you setup your Sparrow wallet, you connected to a public server. Using a public server means you must provide information about your wallet. That information allows the server to search for your bitcoin transactions. It’s like giving someone your home address; that person can watch when you come and go but they can’t enter your home without a key. The information you share is called an extended public key, identified as xpub in wallet software.
- Once you share your xpub by using a public server when connecting a wallet, the company or entities operating that server keeps your xpub and can sell it to companies to research how bitcoin moves from address to address.
- The xpub cannot be used to spend your bitcoin; only to watch as you spend/move it. Watching it includes knowing exactly how much you have.
- The wallets you have used so far, bluewallet and Saprrow both do not require personal information so the public servers do not know your identity.
- Using a public server also means you are trusting that server to provide you with bitcoin information. How do you know they are providing you with accurate information? What version of bitcoin are they running? Do you agree with that version?
- The server operators are incentivized to provide you with accurate information, they also provide a free service to new users with high performance servers that make the experience pleasant.
- The software version running determines what features it can validate, older versions accept transactions following newer rules, without validating them. The concern expressed with this question is regarding hard forks.
- A hard fork occurs when a server operator changes the code of bitcoin not related to accepting transactions. Instead, the change is to the 21 million bitcoin maximum, changing the block size, how often a new block is created, etc.
- This server running a hard fork of bitcoin will disconnect itself from other bitcoin nodes; creating a new coin with a new name.
- This new coin will inherit all the transactions from the original bitcoin timechain. This means you own the same amount of the new coins as you do bitcoin.
- All hard forks of bitcoin experienced extreme devaluation, many no longer exist. Bitcoin holders sell all their new coins and repurchase more bitcoin.
- Those following the new fork lose everything. This mostly occurs because users believe the changes will improve bitcoin and that others will follow. Many learn the hard way that what’s important is how many nodes are running bitcoin, and how many nodes are building blocks. These two factors provide an indication of where the real bitcoin lives. You can see the hash rate of bitcoin compared to different hard forks. Higher hash rates mean the competition to build blocks is increasing.
- In the future, hard forks of bitcoin will occur for technical reasons. The next mandatory hardfork for now is not until 2106.
- The takeaway is that running your own bitcoin node becomes important for your spending privacy and your financial security with the correct bitcoin software. All further content in this checklist is dependent on operating a node.
- Umbrel is an operating system like Windows that you can run on a tiny computer. They offer tutorials on how to build your own from scratch. They also offer a prebuild machine.
- You will need about a month to get your node running and fully synchronized with the time chain.
- The main purpose of this node is to connect it to sparrow wallet instead of the public server.
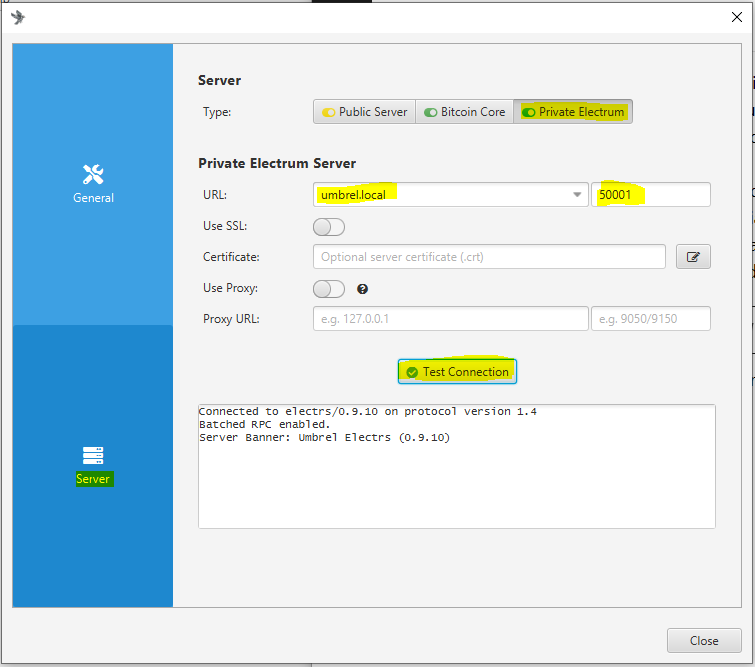
- Open sparrow wallet, go to File > Preferences then Select Server. Select Private Electrum, enter umbrel.local, port 50001 then press Test Connection.
- With your own bitcoin node running and connected to Sparrow wallet, you can begin to learn about cold storage, where your private keys are never entered into a computer connected to the internet. Cold storage options provide different types of protection and conveniences. While reviewing the cold storage post consider how each option interacts with the sparrow wallet software. The sparrow wallet will be your main point of contact with bitcoin and can handle all of the options discussed.
- The recommended route for your cold storage needs is to purchase a seedsigner. This product does not store any data, once its disconnected from the power source all memory and data is erased. Anyone who finds this product in your home will only know you have bitcoin but will not have access to any of it.
- It can be powered by connecting to an electrical outlet. Never connect it to your computer USB.
- It can create private keys that have never been exposed to the internet.
- It can sign transactions using your camera and its camera to send information back and forth to the computer without being connected.
- it makes spending your bitcoin difficult which is a bonus for cold storage.
- The recommended route for your cold storage needs is to purchase a seedsigner. This product does not store any data, once its disconnected from the power source all memory and data is erased. Anyone who finds this product in your home will only know you have bitcoin but will not have access to any of it.
end
.
.
..
.
.
.
.
.
.
.
.
Discuss why using a private server and safeguarding your pub keys is important. could be a new post to reference.
12 vs 24 words
retirement accounts for bitcoin
- Create a cold wallet, do a couple of small test transactions, take some time to think about where you are storing and safeguarding your private keys.
- Review the cold storage options and determine which will work the best for your situation. How you decide to store your private keys should remain private.
- some point need to read the whitepaper
- sparrow wallet onto your desktop/laptop computer where you can create another wallet with different private keys. This will allow you to send bitcoin to another wallet under different private keys.