Ready to get started?
Links to videos for individual steps to build a network to monetize content for you, your family, and anyone else you want to partner with.
What are the costs?
The costs are based on the website services needed to host and build your website and payment processor for bitcoin.
- Website domain name is needed so you can give it to your audience. Google domains makes this process easy and many .com websites are $12 per year.
- BTCPay server is a free software to use however you need it installed on a webserver. Luna Node makes this very easy to setup.
- BTCPay server monthly cost $8 paid to Luna Node (accepts bitcoin)
- Website hosting for your WordPress website is also provided by Luna Node. They make setting up a WordPress website easy. WordPress is a web-based website manager, it’s easy to use and learn and you can build very nice-looking websites to sell your content without purchasing any additional software upgrades. Purchasing products within WordPress can increase the functions available if needed for your business.
- To start out while building your site, Luna Node offers its least expensive service for $3.50 per month. As your website needs grow you can easily upgrade to accommodate additional website traffic.
- An added benefit of using Luna Node for your website is that they offer free email addresses using your domain.
- The time commitment to build your own system, learn to use the software and build the website will take about a month. However, you can build the entire operation in one weekend. The rest of the time is building your website and loading it with content. If you are a WordPress wizard, this will be an easy project to integrate to an existing WordPress website. For each step in the process, we provide an approximate amount of time needed.
- The written instructions, full length videos of each step, and access to one-on-one consulting sessions are available individually for a fee to help you with your journey.
Startup Process
Please note that all the videos were done live, there is no editing other than pausing the video and returning. Please reach out to me if there are questions on the process or an issue with a video that I missed.
- Choose and purchase the name of the website you want to create content under. Google Domains offers easy and inexpensive access to domain name registration.
- This will take about 10 minutes to complete.
- Step by step video for purchasing from Google domains (Video 1) (google has since moved domain services to Squarespace, updated instructions below)
- Go to Squarespace Domains — Domain Name Search — Register Your Domain Name
- Create an account
- Search for your domain then complete the purchase process.
- Install BTCPay server on Luna Node.
- This part will take about 20 minutes.
- Step by step video for launching btcpay server (Video 2) 8 minutes
- Create an account at www.lunanode.com
- Add money to your luna node account
- Create API key in Luna node (API in upper right corner of website)
- Click Create API Credential
- Keep the page open until all steps are complete
- Go to launchbtcpay.lunanode.com
- Copy the API ID and API key from the open Luna Node page
- Click Continue
- Select BTC only
- Add your email for the certificate
- Select mainnet for Network
- Select LND for lightning implementation
- Select VM plan m.2 (2 GB Ram)
- Acceleration, make sure its checked, it will save a few days of time
- Click Launch VM, a new page will appear indicating the site will be ready in a few minutes. You will receive an email when the link will be ready.
- Step by step video for logging into your new btcpay server (Video 3) 3 minites
- Continue by using the link on the page or in the email confirming the server is ready
- You will create the account to gain access to your server.
- Enter your email and password and click Create account
- You will see a dashboard but at this time you need to wait until the server is completed downloading the blockchain. This should be completed in a few days. Check back periodically.
- While waiting for the installation to be completed, build your first creator website, approximately 1 hour
- Step by step video for creating a virtual machine to host your WordPress website (Video 4) 30 minutes
- Log in to luna node
- Click Create a new virtual machine.
- Select the location, you can select the same location where BTCpay server is installed in Toronto
- Enter a hostname, use your website domain name www.bobstatertots.com
- Select a plan m.1s (this is the cheapest while you build your website) can be changed later.
- Enter a hostname, use the name of your website, www.bobstatertots.com
- Choose the m.1s plan which is $3.50 per month while you build the website. You can easily upgrade later as needed.
- Scroll down to Image and click on the Application tab and select WordPress (application)
- Press Create virtual machine
- Wait until machine is up and running by getting confirmation via email
- Refresh the virtual machines page, a green box means its ready
- Write down the External IPv4 value for future reference
- Update the domain name provider with new name servers
- For Squarespace, go to Domains Dashboard then find Advanced Settings area
- Press EDIT for Nameservers Settings – a pop up box will appear
- Select “Use custom nameservers”
- Under name server enter
- ns1.lunanode.net
- ns2.lunanode.net
- ns3.lunanode.net
- Press Save
- Click “EDIT DNS” you should see a message that you are using custom nameservers
- In Luna Node, go to DNS settings to setup DNS
- Add a zone by entering the name of the website without www
- Name: bobstatertots.com
- TTL: should be prepopulated
- Press add zone
- Once added, click Edit records
- The NS records should be added, now add A records
- Click add record
- Type: A
- Name: bobstatertots.com
- Data: (this is the ip address written down)
- Click add record
- Click add record again
- Type: A
- Name: www.bobstatertots.com
- Data: (this is the ip address written down)
- Click add record
- In these last two steps you added 2 records one with and one without www. When people enter your website address, they will go to the same place regardless if they use www or not.
- Add a zone by entering the name of the website without www
- Now we need to ssh into virtual machine so that we can update the server, reset the password and get a certificate for https.
- Go to virtual machines and click on the machine name bobstatertots.com
- Click on VNC Console
- A new window opens up, username and password is on the virtual machine page. Copy the password into a notepad file to ensure that you see the correct letters.
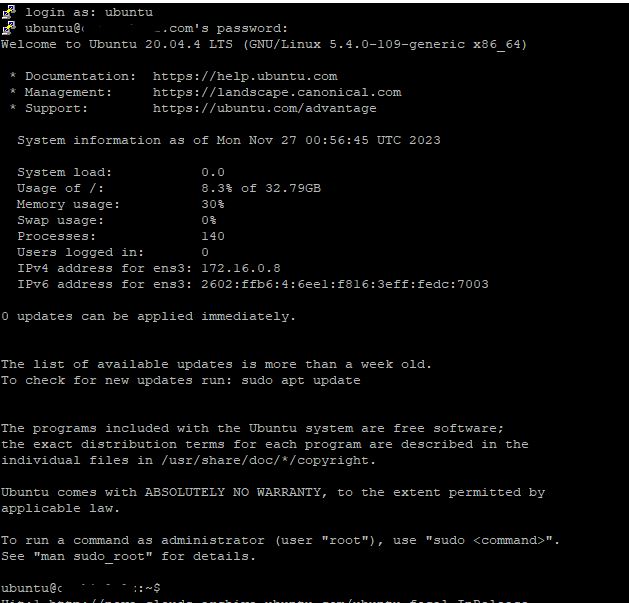
- Once in, at the command line type (which above is right after ~$)
- sudo apt update
- then press enter, it will download all the updates. Then enter
- sudo apt upgrade
- then press enter, it will install all the updates. it will ask you to confirm, type the letter y and press enter. The installation will take a few minutes. Once completed, you will see the command line again. Then type
- sudo reboot now
- This will reboot the server. Using the VNC console, log in again to continue, changing the password.
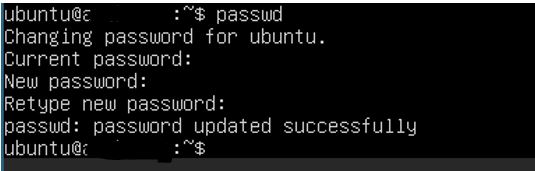
- Type the command passwd and complete the steps
- Once in, use this command (just type the txt below directly into the command line. Just change the name of your website!) This is a special script Luna node provides to register your domain so that you can use https and your viewers won’t be warned that your website is dangerous.
- sudo /opt/ssl.py bobstatertots.com www.bobstatertots.com
- press enter
- you will be prompted to confirm the names of the websites.
- Wait to see Done! At the end or review and correct any errors.
- This process starts a job that will keep the certificate up to date.
- Type exit and press enter to log out
- sudo apt update
- Now to get WordPress setup. Go to the browser and go to your new website. (enter the ip address you wrote down if the name does not work yet)
- You will come to a word press page to select language, then press continue
- Enter a site title Use the name of the website for now
- Select a username to log in with, this will not be seen by website visitors
- Update the password if necessary
- Select an email (the email you select here will be where you will receive emails when someone pays you with bitcoin)
- Press install WordPress
- You will be directed to log in again, once logged in you are ready to create the website.
- Bookmark the login page
- YouTube has many videos on any WordPress topics.
- Setup custom email, walk through basic settings and setup for WordPress. Also review picking a theme and create a post and publish it.
- Step by step video for custom email and WordPress settings (Video 5) 16 minutes
- In Luna Node, setup email for sales@bobstatertots.com
- New DNS records are automatically setup
- Add users to create separate email accounts
- Test new usernames at mail.lunanode.net
- Review themes and create a post and publish
- Video on how to forward emails from luna node to gmail app (TBD)
- In WordPress, we cover basic settings
- Create a new post with a photo and text.
- In Luna Node, setup email for sales@bobstatertots.com
- Step by step video for custom email and WordPress settings (Video 5) 16 minutes
- More WordPress website setup items
- Step by step video of more WordPress setup (Video 6) 12 minutes
- Adding a new user process
- Setup SMTP email service in WordPress so that emails can be sent from your website.
- This is important so that if you forget your password to log into your website you can retrieve your password via email.
- Create DNS records in Luna Node
- Sending test emails
- Sending test password reset email
- Step by step video of more WordPress setup (Video 6) 12 minutes
- Setup BTCPay server and create store
- Step by step video of the BTCPay server configuration (Video 7) 13 minutes
- Review account settings
- Setup SMTP email service
- Test email service
- Setup Lightning node
- Review Store settings
- Step by step video of BTCPay server configuration continued (Video 8) 8 minutes
- Get private key for storage for LND. This will be 24 words, follow the instructions in the links below after writing them down.
- Make sure to review this at some point after finishing the entire video set
- Get node URIs (all 3) and send email to me at sales@anafaskrowten.com requesting a new channel open.
- When sending an email to me, please send all 3 URIs
- Please send me your website example, www.bobstatertots.com so I take a look at your site. If you do not want to share your website, that’s ok I just want to verify you are following my process.
- Once you send the email and you get a response from me that the channel is open, continue to the next video below.
- Get private key for storage for LND. This will be 24 words, follow the instructions in the links below after writing them down.
- Step by step video of your new channel in Ride The Lightning (RTL) (Video 9) 15 minutes
- See mempool.space of the transaction
- Review settings in RTL
- Discussion of number of channels: for the purposes of setting up your website and testing the waters, your single channel to me will be perfect. We can discuss your needs anytime.
- Step by step video updating store name and installing LNbank (Video 10) 6 minutes
- Change store name to Main Store so that you can have the store name match the wallet name in LNbank
- The Main Store will not have a LNbank wallet
- No payments will be made to the Main Store, only to the stores that have a website name. Follow this configuration so that adding more stores to BTCPay server is easy.
- Install LNbank
- Restart the server
- Change store name to Main Store so that you can have the store name match the wallet name in LNbank
- Step by step video final configuration and connect BTCPay to website (Video 11) 26 minutes
- Create new LN wallet
- Walkthrough of connecting mobile phone BlueWallet to the new LNbank wallet
- any payments made to your website will appear on your mobile phone
- Add a new plugin for WordPress to accept bitcoin lightning payments
- Search for “btcpay” and select BTCPayWall
- Setup new plugin to connect to our BTCPay server store
- Generate API Key
- Copy that key to your WordPress website plugin settings. It will be the same for both View and Create
- Create a new paywall template, you do not want to create a template for each post, updating the template does not push to the post. Just create a few based on price or other settings type, maybe by size if you play with the height/width
- Apply the paywall to your post
- Adjust each post for title or amount and walkthrough the paywall settings on the post.
- Demo a payment
- Review first payment in BTCPay server and RTL
- See invoices in your store
- see invoices in RTL
- Create new LN wallet
- Step by step video of the BTCPay server configuration (Video 7) 13 minutes
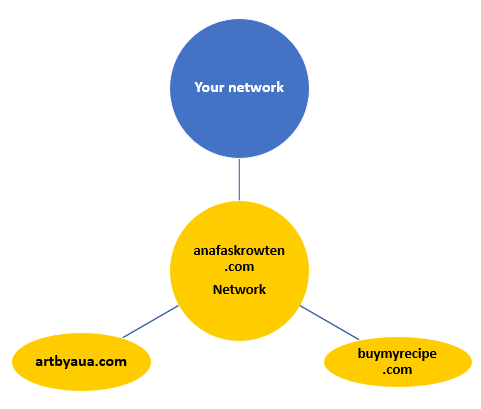
At this point, you have setup a BTCPay server with a Main Store and a store for your first actual content website (www.bobstatertots.com). You will also have BlueWallet mobile app connected to your LNbank account so that you can see transactions paid. You can continue to build your website and test out payments and get comfortable with all of the software so that you can maintain it easily over time.
Below are more videos and steps for adding more stores. You can add more stores to offer bitcoin payments to your extended family.
- Step by step video adding more stores to your BTCPay server (Video 12) 17 minutes
- When you have more family that you want to help build their website and accept payments using your BTCPay server, watch this video to setup another store.
- Discussion about payments not going through (Video 13) 5 minutes
- While you are running your network, you will one day experience problems. Remember that this is just software that you are managing and it’s important to keep your server up to date. You will also wato bookmark the BTCPay server website and download and install the Telegram app and connect with BTCPay server group on Telegram. This will allow you to see others using the software discussing it and helping each other.
Continuing Education
- Bitcoin Mastery Checklist
- What is Bitcoin lightning?
- learn how to buy bitcoin
- learn how to store your private keys
- Emergency access planning
- Private key storage (hot)
- Testing your private key backup
Shutdown Process
In the following videos, I walk through all the steps to shutdown your server and websites you are hosting on Luna Node. Every node operator needs to have an emergency plan just in case something happens, and you need someone to be able to shutdown your operation and retrieve any bitcoin. These videos should be sufficient to help someone not familiar with any of this to follow along.
- Steps to close channels and see closing transaction on mempool
- Discussion about paying out to the owners of the different websites
- Steps to move the bitcoin to a new address
- Steps to shut down website and BTCPay server
Overwhelmed? Need more help?
Reach out to us at sales@anafaskrowten.com or schedule a help session and we will help you through the process.